Please - Rate This Site @:
http://www.dxzone.com/cgi-bin/dir/jump2.cgi?ID=21075
Project Overview:
So I've been reading about this Small Space antenna (Small Space HF
Antenna) that is being sold as the TAK-Tenna. Really neat idea - Has a 30 inch boom and Spiral Coils on the ends. See
a picture at http://www.taktenna.com/
Looks easy to build - Right ?
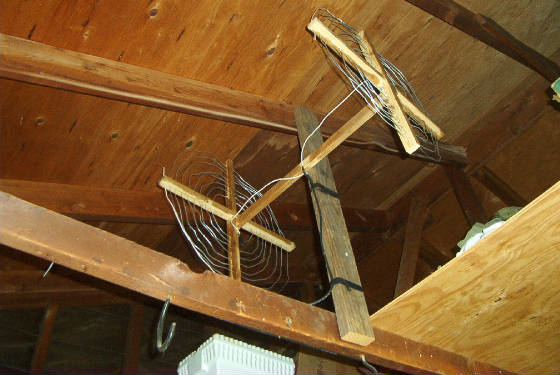
So I Built my version out of wood - Mine is very ugly as compared
to the store bought one (See Pictures).
Materials and Tools • Parts:
1.) 3 - Wooden sections - 1 1/2 in X 1/2 in X 8
ft - Cost 92 Cents each - Home Depot
2.) 1 - 100' Spool of Steel Guide/fence
Wire - Cost - $7 - Home Depot - The purchased version uses some type of "Special" patented wire, but this seemed fine.
I tried Copper, but it was not stiff enough to make the Spiral Coils. Again from quick test it did not seem
critical - From what I read larger gauge wire is better for improved band width.
3.) 1 - 25 foot RG8 coax with PL259 - Radio Shack
- Close Out - $5
4.) 2 - Packages - Nuts/Bolts - $2 -
Home Depot
5.) 2 - Aligator Clips - Free from my
junk Box.
6.) Few Feet of Electrical Tape - Free
from my junk Box.
Total Material Cost: $16.76
The commercial version uses PVC and tie wraps, which would have been
much easier.
Tools:
a.)
Saw - I just used a simple hand saw.
b.) Drill
with wood bits - I just used a simple hand electric drill.
c.)
Flat Screw Driver and Rubber Malet.
d.) Wire
Cutters.
e.)
Gloves and Eye Protection.
Fab Time:
For my version was about 4 hours - Drilling Lots of Holes and feeding
the wire in to make the Spiral Coils was most of the work.
Testing:
However - Test wise it isn't bad I got it tuned up on 40 meters at
about 8 feet off the ground and it has an SWR 1:2 to 1:5 from 7.30 to 7.175 MHZ (Without a Transmatch). Also does ok
on 15 meter - Tune up wise. Bad news the performance is not Great - Signal pick up is several S units below my Dipole, but
it does work. From what I have read the Antenna has problems in that most of the performance is based on feedline radiation
(See the links below).
http://groups.google.ie/group/rec.radio.amateur.antenna/browse_thread/thread/167fb7a34305cf3e
http://lists.contesting.com/_antennaware/2008-04/msg00021.html
Summary of Results:
I'm still testing and it was an interesting experiment. The Antenna
fits into a small space 25 inch X 30 inch. Hey it works. If you have no space it might be worth $20 and a few hours of your
time or If you aren't a Homebrewer Buy one. If you make your own one point - I needed more wire than the 468/7.2 MHZ = 65
Feet Total or 32.5 Feet per side - I had to add wire after the fact. So I would make it about 33.5 per side.
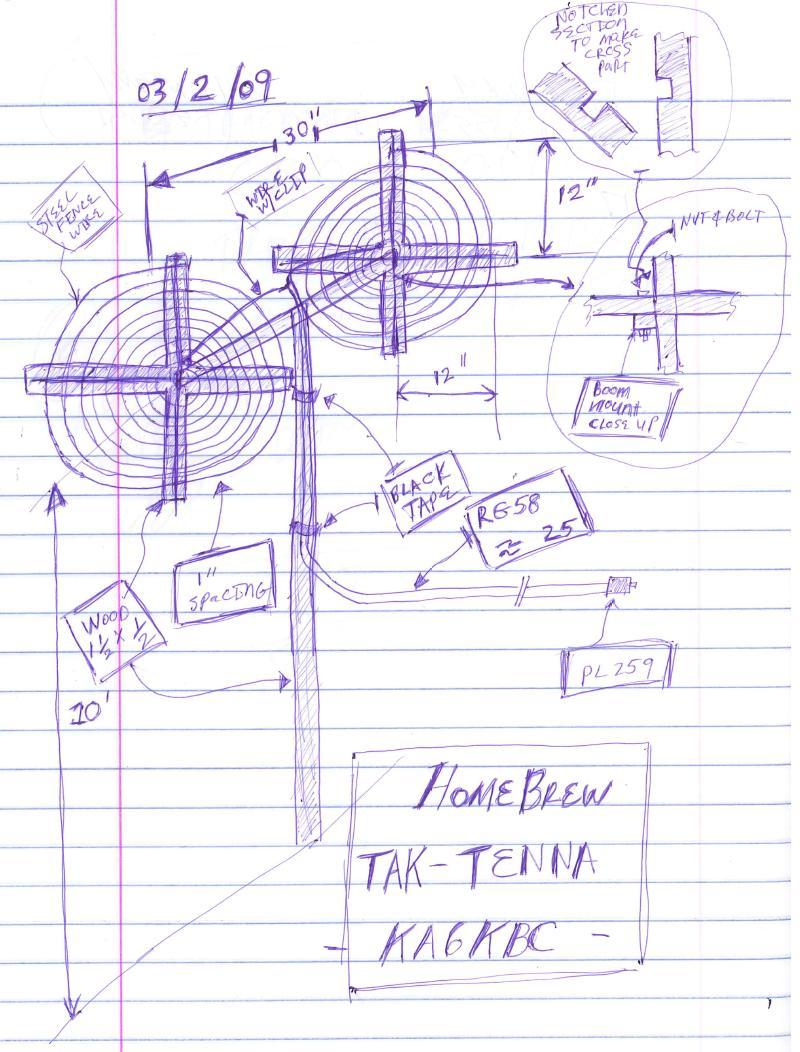
Measurements:
One
more added item - Someone had a question about my dimensions:
Boom = 30 inches meaning Cross Pieces are about 30 inches
a part.
Cross Pieces = 25 Inches Across or 12.5 Inches from center
Hole Spacing from Center, but this did
not seem critical, but I used:
12 in
11 in
10 in
9 in
8 in
7 in
6 in
5 in
4 in
3
in
Total Turns = 10
Tuning:
a.)
Put the antenna in the expected operating position (Mine was about 8 feet in the air).
b.)
Conect the Coax via the Aligator Clips about 2 inches from the end of the smallest inner Spiral Coils.
c.) Measure
SWR in the Center of the 40 Meter Band (SSB or CW) you intend to use most. If the SWR is too high move to
Step d.
d.)
Move the Aligator Clips/Coax out evenly about 2 inches on each Spiral Coil.
e.) Repeat Step c.
I
was able to acheive acceptable SWR after about 3 cycles of adjustment without a Transmatch.
Construction Steps:
a.) Measure/Cut - (1) - 30 inch boom section.
b.) Measure/Cut (4) - Cross members - 25 inches
sections.
c.) Measure/Notch @ about 12.5 Inches -
I just cut with a hand saw then tapped out with a Flat Screw Driver and Rubber Malet.
d.) Drill holes in Cross members as noted
above - Starting 3 inches from center then working out in 1 inch steps out to 12 inches. If you are careful
you can save sometime by drilling two parts at a time.
e.) Here is the Hard part - Put the Notched
Cross members together then start feeding the wire to create the Spiral Coils. I started from the biggest
to the smallest. I would recommend Gloves and Eye Protection.
f.) Once the Spiral Coils are completed
bolt them to the Boom.
g.) I then used the last section of wood
for mast and bolted the Boom to this part.
73's
Bill
- KA6KBC
More -
Pictures:
https://billbrwn.tripod.com/id7.html
40m
Homebrew Tak-ntenna (http://forums.qrz.com/showpost.php?p=1250593&postcount=1)
Credit Where Credit is Due:
Very important work on this orignial Design was done first by:
Bill
Petlowany, K6NO
http://www.qsl.net/wa2lqo/nlaug03.html
http://www.wr6wr.com/newSite/articles/features/olderfeatures/antennaswithtwist.html
Then
Refined by:
Steve – WA2TAK
http://www.tak-tenna.com/
Also some very interesting Recent work
from WBillJohnson - Looking at Boom Lengths and Coils Spacing:
http://wbilljohnson.com/zmvantenna/zmvantenna.htm#intro
Older
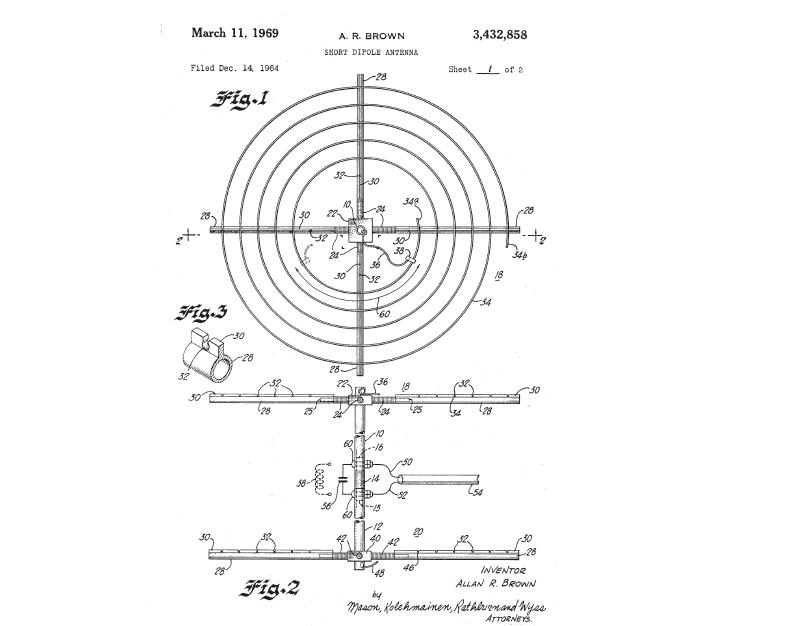
Patent Info (Same Last Name, but no relation):
http://bvarc.freeshell.org/newsletter/BVARC_December_2007.pdf
http://www.google.com/patents?id=aZluAAAAEBAJ&printsec=abstract&zoom=4&dq=3432858#PPA1,M1